Learning Unreal Engine 3 ¢ UE3 Editor
LightMaps
This tutorial is all about lightmaps, which are the high-quality light baking method in Unreal.Ā The first half of the tutorial describes how to use lightmaps on CSG and existing assets inside Unreal.Ā The second half explains how to create lightmaps for your own meshes in Maya or Max.Ā You can obviously skip that section if you donÆt plan on creating your own models.
1) WhatÆs a lightmap?
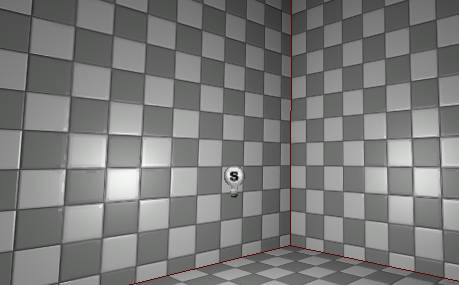
When you bake lighting on your scene, the lighting data gets stored into one or more images called lightmaps.Ā Create a test scene now (or open an existing scene) thatÆs a simple CSG room with a light in it.Ā Something like this.
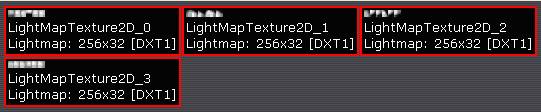
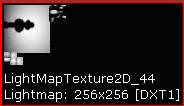
Save your scene (call it DM-LightmapTest.ut3) and bake lighting.Ā Now look in your Generic Browser, and youÆll see a package named DM-LightmapTest.Ā If you select it, youÆll see four texture images in it ¢ these are the lightmaps that got baked for your cube.Ā (I wonÆt go into why there are four of them ¢ the reasons are technical and they wonÆt affect your work.)Ā If you create a bigger level, the lightmaps will be bigger because they cover more surface area.Ā Pretty simple.
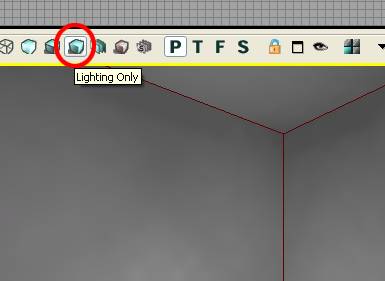
Now switch back to the main editor window and click the ōLighting Onlyö button in your perspective viewport.Ā The checkerboard goes away and youÆre left with just the lighting.Ā But notice itÆs a little blotchy ¢ thatÆs because thereÆs not a lot of detail in the lightmap.Ā (After all, those images in the generic browser were pretty small.)Ā
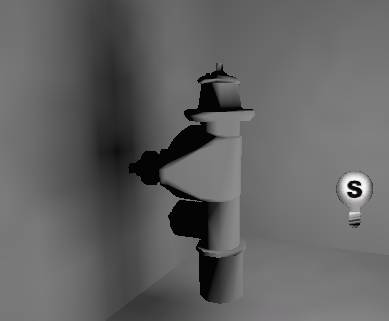
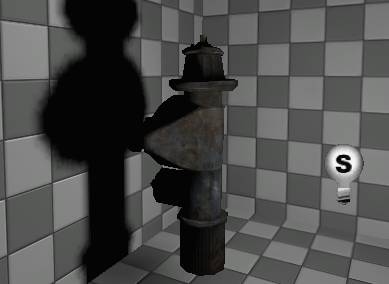
Ok, maybe itÆs not that obvious.Ā ItÆll be much more clear if we put a static mesh in the world that casts a shadow on the wall.Ā In the HU_Deco3 package thereÆs a fire hydrant prop (named S_HU_Deco_SM_FireHydrant01.) Place that in the world between your light and the wall.Ā ItÆs a pretty small prop, so scale it larger, at least 4x size.Ā
If you bake lighting youÆll see a big blurry shadow on the wall.Ā ThatÆs the effect of having a low-detail lightmap.Ā
LetÆs look at how to increase this detail.
2) Adjusting lightmaps on CSG surfaces
Go back into lit mode and select the wall that has the blurry shadow on it.Ā Open up the Surface Properties window by going to View->Surface Properties (or by hitting F5.)Ā
WeÆve covered most of these settings in an earlier tutorial, but letÆs look at the ōLightingö section.Ā Specifically the ōLightmap Resolutionö parameter.
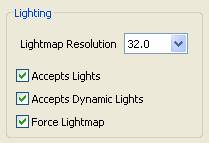
A setting of 32 means that thereÆll be one lightmap pixel every 32 units.Ā If we want more detail (and we do!) we can make that number smaller.Ā Set it to 4 and bake again.Ā YouÆll notice the bake takes much longer, but youÆve got a much more obvious shadow from the fire hydrant.Ā (If you try setting the resolution to 1, it may take over a minute to bake, but the results look even better.)Ā
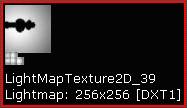
Go back to the Generic Browser and find your map.Ā YouÆll notice some new lightmap textures have been created (and the old ones may still be hanging around too ¢ Unreal will clean those up later.)Ā If you look closely at your lightmap, you can see one big square with a shadow of the fire hydrant on it, and five tiny blurry squares.Ā That adds up to the six sides of your room.
And thatÆs about it ¢ if you need more detail, set the Lightmap Resolution to a lower value, but keep in mind your bake times will suffer.
3) Lightmaps on Static Meshes
Baking lighting on Static Meshes is a little more versatile than on CSG geo.Ā By default, all static meshes use Vertex Lighting ¢ instead of baking into an image, light values get baked into the vertices that make up the geometry, and lighting is blended across the surface.Ā
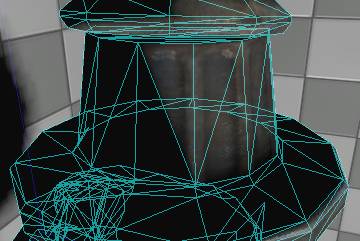
In my map thereÆs kind of a weird hard shadow near the top of the fire hydrant.
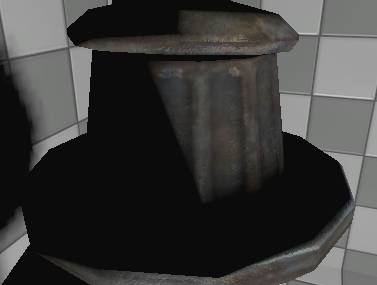
If I overlay the wireframe on the image (Photoshopped for clarity) you can see that the shadow falls right along one of the meshÆs edges.Ā ThatÆs effectively the result you get from vertex lighting.Ā
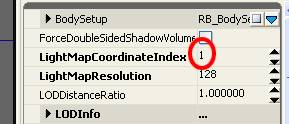
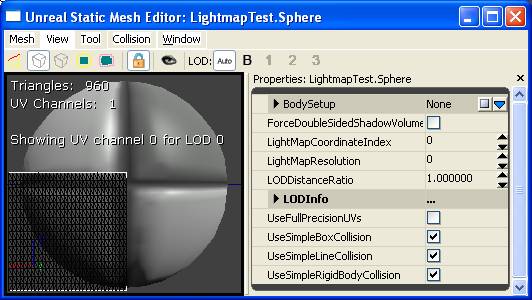
But lots of meshes in Unreal are set up so that you can put a lightmap on them too, and this fire hydrant is one of them.Ā Open up the mesh in the Generic Browser and look at the LightMapCoordinateIndex value.Ā If itÆs ō1ö, then the mesh is probably set up for lightmaps.Ā If itÆs ō0ö, it probably isnÆt.
So how do we actually turn on the lightmap?
Close the Static Mesh Editor, select the fire hydrant in the scene, and open up its properties (hit F4.)Ā Open up StaticMeshActor, StaticMeshComponent, scroll all the way to the bottom, and open the StaticMeshComponent sub-category.
Right now, ōbOverrideLightMapResolutionö is checked, and ōOverriddenLightMapResolutionö is set to 0.Ā The ō0ö means itÆs using vertex lighting.Ā
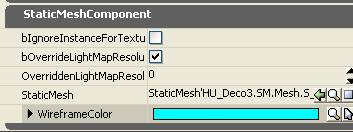
On CSG surfaces a smaller number meant more detail ¢ thatÆs because the number specifies how far apart lightmap pixels will be calculated.Ā On a static mesh, you control the size of the lightmap image directly.Ā If you type ō4ö, itÆll calculate a 4x4 image to paint the lighting onto, which definitely isnÆt enough detail.Ā (YouÆd get better results with vertex lighting!)
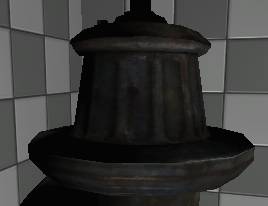
Change the number to 64 and bake lighting.Ā YouÆll see that the hard lines went away, and lighting generally looks better.Ā You can go higher to get even more precise results, but again, baking will start to take a lot longer and for an object this small itÆs probably not necessary.
If you open up the Generic Browser again and look at your map, you can see that the lightmap updated again.Ā ItÆs got the six sides from the room, plus an additional patch of scattered detail ¢ thatÆs the lightmap for your fire hydrant!
4) Picking a good lightmap resolution
So now you know how to control lightmap detail on your CSG surfaces and static meshes.Ā But what settings are appropriate?
The general rule is to go as low as you can.Ā If your mesh looks good enough with vertex lighting, use vertex lighting.Ā If your brush looks good enough with the lightmaps set at 32, leave them there.Ā
Any time you increase detail on lightmaps, there are three consequences.
1) Bake times go up.Ā
2) Your map gets bigger, which means it takes longer to download and longer to load.
3) Your map takes up more memory.Ā If it gets too big, it may not load on some systems or on PS3.Ā
So be careful!
5) Creating lightmaps for custom static meshes
If you create your own environment props you may want to add lightmaps to them.Ā Setting this up is pretty simple.Ā All you need to do is add a second UV channel to your mesh, and make sure the UVs follow these guidelines
- The UVs fit completely within 0-1 texture space
- The UVs donÆt overlap each other.
The best way to do this is to create the UVs in your 3D package (Max or Maya), but we can also auto-generate lightmap UVs inside Unreal.Ā LetÆs look at how to do this.
Create a sphere in your 3d package and import it.Ā Double-click the mesh to open up the Static Mesh Editor.Ā Go to View->UV Overlay and youÆll see the default set of UVs.
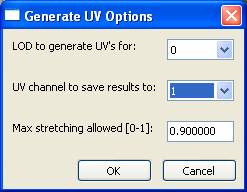
To create the second UV set, go to Mesh->Generate Unique UVs.Ā Change the ōUV Channel ģö parameter to 1 and hit OK.
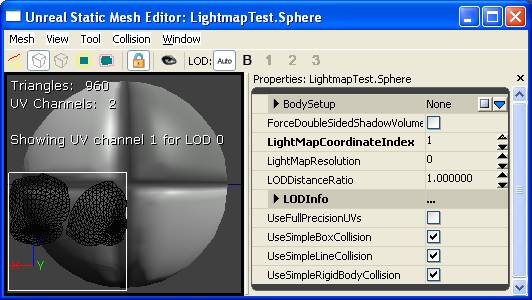
Now change the LightMapCoordinateIndex to 1, and youÆll see the result of the auto-UV generation.
These arenÆt the best results ¢ thereÆs a lot of unused space, and thereÆs a big uneven seam surrounding the mesh.Ā So letÆs look at how to create lightmap UVs in your 3D program.Ā WeÆll cover Max and Maya separately, so scroll down to the section that applies to you.
6) Creating Lightmap UVs in 3ds Max
IÆm using Max 9 for this demonstration, but the process is the same in any version.Ā
To start, create a sphere.Ā Switch to the Modify tab, and under the Modifier List choose UVW Map.Ā
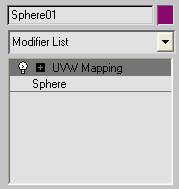
Switch to Spherical mapping.Ā The key to getting lightmap UVs to work is to change the Map Channel parameter to 2.Ā (This creates a second set of UVs that will be used for lightmapping.)Ā
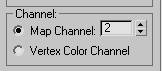
This should create a good set of UVs that donÆt overlap, but we still need to make sure they fit into 0-1 space.Ā Go back to the Modifier List and add an Unwrap UVW modifier.Ā Change the Map Channel to 2, hit ōyesö in the dialog that pops up, and hit Edit.
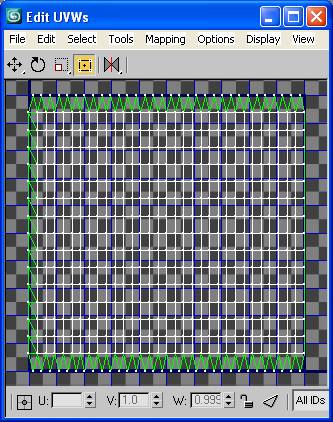
In this case things actually look pretty good, so we donÆt need to make any changes.Ā (There are no overlaps and everything is in 0-1 space.) ĀClose the window, save your work, and export the mesh like normal.Ā Import it into Unreal.Ā Open up the Static Mesh editor and set the LightMapCoordinateIndex to 1.Ā Turn on UV Overlay, and you can see the results are the same as you set up in Max.

ThatÆs it!Ā YouÆre ready to bake lightmaps on this mesh.
7) Creating Lightmap UVs in Maya
This process should be pretty much the same regardless of which version of youÆre using, but some of the menus have changed places.Ā These screenshots were taken in Maya 8.5.
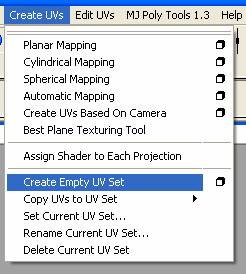
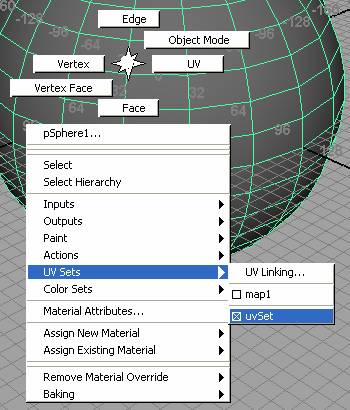
To start, create a sphere mesh.Ā Under the Create UVs menu, choose Create Empty UV set.Ā The UV set name doesnÆt matter.
Open up the marking menu on your sphere, select UV Sets, and select the second set.
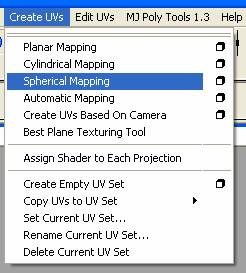
Now any UV work we do will be applied to the second UV channel.Ā At this point youÆd lay out the UVs for your mesh, but for this test, just apply spherical mapping.
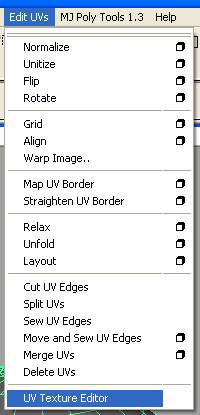
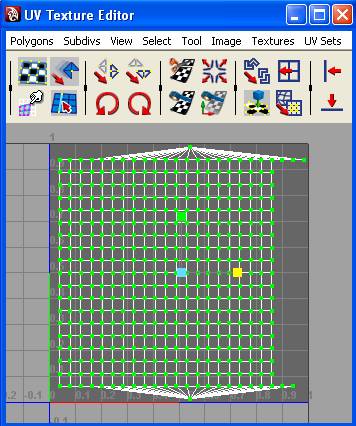
Now open up the UV Texture Editor so that we can verify the UV layout.
In my case it looks like thereÆs no overlapping, which is good, but the UVs fall outside of 0-1 space, so lighting wouldnÆt bake right.
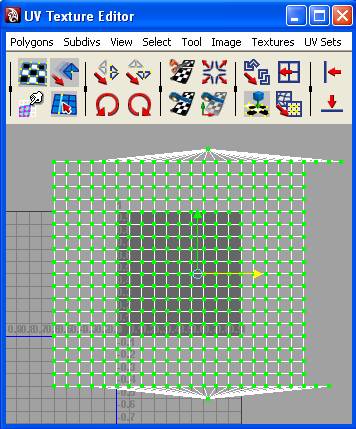
Scale the UVs down and center them so that they fill the gray box as completely as possible.Ā (If this were ōfor realö, IÆd reconnect the triangles at the top so that I can fill up the entire UV space, but for now this is fine.)
Save your file, export the sphere, and bring it into Unreal.Ā Open up the Static Mesh editor and set the LightMapCoordinateIndex to 1.Ā Turn on UV Overlay, and you can see the results are the same as you set up in Maya.
ThatÆs it!Ā YouÆre ready to bake lightmaps on this mesh.
8) Authoring really good lightmaps for static meshes
Here are a couple additional pointers you can use to set up good lightmap UVs.
Follow the rules ¢ no overlaps, and stay in 0-1 space.Ā Your bake will look broken if you break the rules.
Always fill the full UV space.Ā You may have to stretch the UVs a little, but stretching lightmap UVs a little doesnÆt normally hurt..
DonÆt let UV clusters get too close to each other.Ā If thereÆs only a tiny distance between UV clusters and you bake a low-res lightmap, some light will bleed between one surface and another.Ā
UV density doesnÆt need to be uniform.Ā If certain parts of the mesh are less important (like the bottom), their UVs can take up a lot less space relative to the rest of the mesh.
Seams in lightmap UVs WILL be visible.Ā Any time thereÆs a seam, youÆll get an obvious line in the lighting.Ā So if a surface of your object is supposed to be contiguous, do everything you can to stitch UVs together, even if it means some stretching.Ā The ōRelax UVsö tools work really well when youÆve stitched your UVs together.
Automatic mapping may seem good enough, but hand-tuning UVs is usually worth it.Ā If the lighting on your mesh looks bad, your mesh looks bad.Ā Spend the extra 10 minutes and do it right.