Learning Unreal Engine 3 ¢ UE3 Editor
Editor Basics Topic 2 ¢ Generic Browser
In this section weÆll learn what the Generic Browser is, and how it works.Ā WeÆll pick up where we left off from Topic 1, with the map DM-HeatRay loaded.
1) Opening the Generic Browser
So far weÆve been working in the main editor window ¢ this is your view of the game level, and it shows where all of your objects and special actor types are placed.Ā But that rubble pile we looked at earlier didnÆt materialize out of thin air, and its geometry and texture info isnÆt stored in the map.Ā ItÆs stored in a ōPackageö, which can be thought of abstractly as a catalogue of items that you can place in your level.Ā It can also be thought of as a zip file filled with the actual data for the objects youÆll place.Ā Where do we find these packages?Ā The Generic Browser!
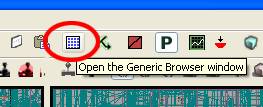
To open the Generic Browser, click this icon at the top of the window.
It should open up, looking something like this.

The box in the bottom-left is our list of packages.Ā The box in the top-left lists all of the asset types, and gives us a way to filter them.Ā YouÆll notice that right now, there are probably 200 packages listed.Ā Epic used a pretty good naming convention to help distinguish what goes into packages ¢ any package that starts with ōA_ö holds Audio files, ōVHö holds Vehicles, ōWPö holds Weapons, etc.Ā But all we really care about is finding static meshes right now.Ā So in the filter box at the top left, click the checkmark in front of ōStatic Meshö.Ā
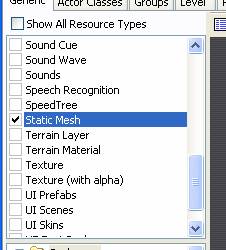
Also note ¢ you can show as many asset types as you want by checking multiple checkmarks.Ā You can click ōShow All Resource Typesö to get the full listing back, and you can double-click an asset type to select ONLY that asset type.Ā As usual, give it a try and youÆll see!
2) Finding an asset
Once youÆve got some experience with the editor youÆll learn what packages contain which props, but for now thatÆs not going to help.Ā WeÆre filtering Static Meshes, so weÆre down to about 40 packages, but itÆs still going to be tough to find, say, that rubble pile we looked at earlier.Ā So letÆs go back to the main editor window and select an instance of the rubble mesh.
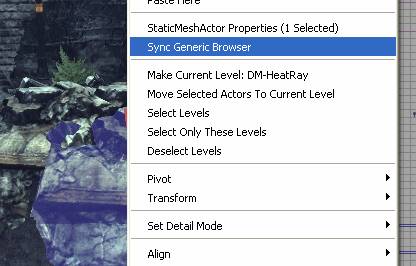
Right-click on the rubble, and click ōSync Generic Browserö.
Aha!Ā ItÆs in a package called ōHU_Deco_RubbleAö, in a subfolder SM/Mesh.Ā Again, Epic naming conventions ¢ ōHUö means ōHumanö built props (As opposed to one of the other species in the game.)Ā And we can see two other rubble props in there.Ā
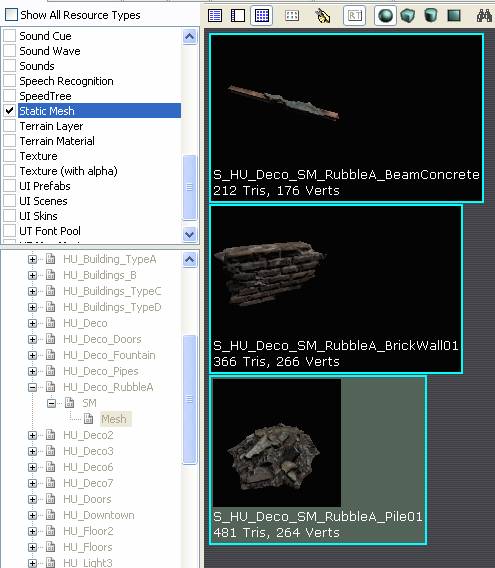
But wait, this is Epic, thereÆs got to be more rubble than that!Ā Notice how the package name is grayed out?Ā That means itÆs not fully loaded ¢ to save time and memory, only the objects used in this particular map were loaded.Ā Right-click on the package name and select ōFully Loadö.

The package name turns bold, and now there are 22 rubble props listed.Ā ThatÆs more like it!
3) Placing an asset
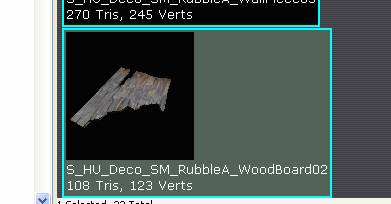
Say we want to place this broken board on the ground.Ā Select it in the Generic Browser by clicking once.
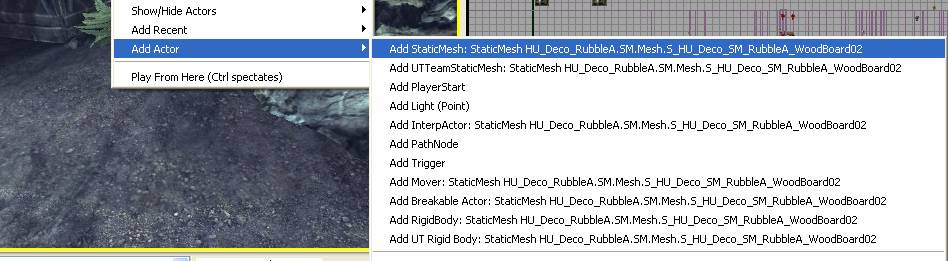
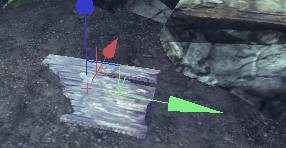
And in the main editor window, right-click on the ground, select ōAdd Actorö, and ōAdd StaticMesh Blahblahblahblahö.Ā Your mesh should appear on the ground.
You can add lots of different types of objects this way, but since adding static meshes is so common, thereÆs a hotkey for it.Ā Hold ōsö and click once in the viewport.Ā (Be sure not to click and drag.)Ā Your mesh should appear on the ground.Ā You can now move, rotate, and scale it to exactly where you want it.
4) A list of all objects in the scene
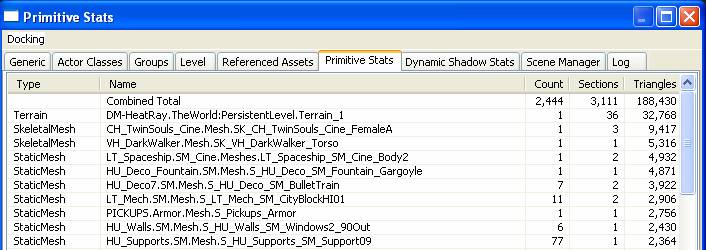
There are lots of tabs in the Generic Browser window, and the ōGenericö tab is the one youÆll use most, but another useful one is the ōPrimitive Statsö tab.Ā Click on it now.
This is a listing of all of the static meshes, skeletal meshes, and CSG geo in the world.Ā You can sort by any column.Ā For instance, click on ōCountö, and youÆll see that our rubble pile (after cloning it around) is used 144 times, and itÆs the most commonly-used object in the scene.Ā Cool!Ā You can double-click on any item in the Primitive Stats window to select it in the world.Ā Click around, and get a sense for how props were used in the level, and how the scene was put together.
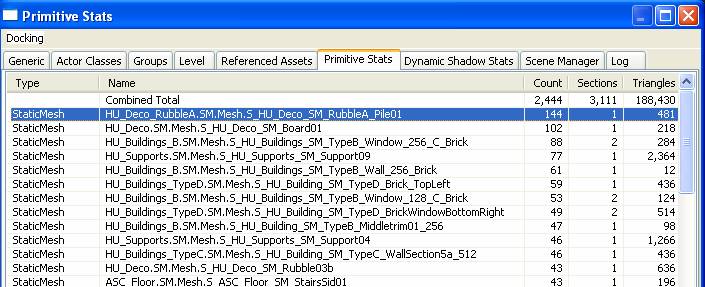
Also useful, sort by the ōTrianglesö tab.Ā You can see that the terrain and some skeletal meshes have the most triangles in the level, but that there are only a few static meshes that have over 2000 triangles, and most are in the hundreds.Ā Anything whose ōTypeö is ōModelComponentö is CSG geometry, which you can ignore for now.Ā
5) More useful Generic Browser stuff.
Go back to the ōGenericö tab.Ā LetÆs look at some other ways to find and view objects.
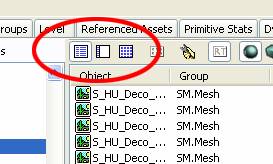
These three icons control how assets in packages are displayed.Ā Click on ōListö.Ā Now, instead of icons, we get the name and some detailed info of the objects in the package.Ā Clicking on ōPreviewö gives us a hybrid mode.Ā
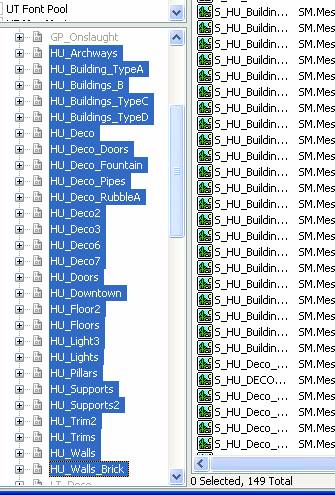
Again, there are 22 meshes in that Rubble package.Ā But we can view the contents of lots of packages at once.Ā Just select them!Ā (Either ctrl-click to add individual packages, or shift-click to select a whole range.)
I selected all of the ōHUö packages, and now (as you can see at the bottom) weÆve got 149 meshes.Ā I could then right-click and Fully Load all those packages and get even more.
Again, Unreal only loads the packages that are referenced by the map.Ā We can find more by going to File->Open (in the Generic window), and browsing to C:\Program Files\Unreal Tournament 3\UTGame\CookedPC\Environments.Ā Load up a couple and see what kinds of props they contain.Ā (DonÆt load everything in the folder though ¢ itÆll take forever and Unreal will probably crash.)
If you havenÆt already, try placing some new static meshes in the world.Ā See if you can build a little scene within an existing level ¢ itÆll be good practice!Ā