Learning Unreal Engine 3 ¢ UE3 Editor
Importing Meshes
If youÆre a 3D artist, this section is for you.Ā It talks all about how to get a mesh youÆve created out of Maya or Max (or any other program, really) and into Unreal.Ā Please read Working With Packages if you havenÆt already - it covers the basics of importing any asset type.
The process for exporting is basically the same for both Max and Maya, so IÆll cover both of them in this document.Ā IÆll assume youÆre familiar with the workings of your 3D program, so I wonÆt go into too much detail on either.
1) Setting up the exporter
The format youÆll use to get your meshes into Unreal is ō.ASEö.Ā Max comes default with an ASE exporter, but youÆll need to install a plugin if you want to export from Maya.
The exporter for Maya is called ActorX.Ā You can download it from EpicÆs web site here.Ā You may also need to download the DLL file listed on the site, msvcr71.zip.Ā
Copy the plugin and DLL into your Maya plugins folder.Ā Launch Maya, open the Plugin Manager, and ōloadedö and ōauto-loadö for the ActorX plugin.
To open the exporter, enter the command ōaxmeshö in the script window.Ā (YouÆll probably want to make a shelf icon for this.)
2) Create a mesh and export it
LetÆs start by creating a simple sphere.Ā Just create it at the origin, and make it fairly large.Ā (WeÆll worry more about scale later.)Ā
Max:
To avoid warnings, you need to make sure your object has a material assigned, and that the material has a texture plugged in to the diffuse slot.Ā Do that now.
Select the sphere.Ā Go to File->Export Selected, and for ōSave As Typeö, select ō.ASEö.Ā Enter ōsphere.aseö for the filename, and save it somewhere easy to get at, like your desktop.
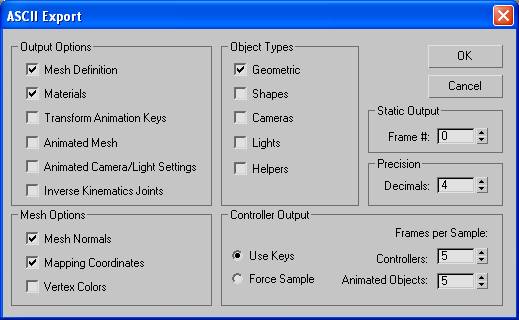
In the ASCII Export dialog, check the following settings and hit OK.
Maya:Ā
Run the exporter tool (use your shelf button, or just type ōaxmeshö in the script panel.)
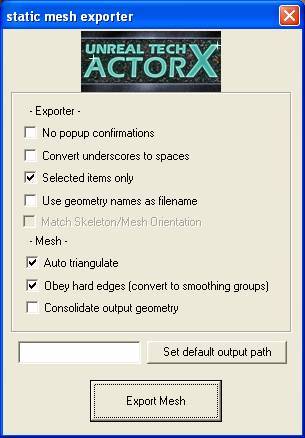
In the Static Mesh Exporter dialog, check the following settings and hit Export Mesh.
Enter ōsphere.aseö for the filename, and save it somewhere easy to get at, like your desktop.
3) Import the mesh
Switch back to Unreal.Ā Open the Generic Browser and go to File->Import.Ā Browse to your exported file (sphere.ase), select it, and hit Open.
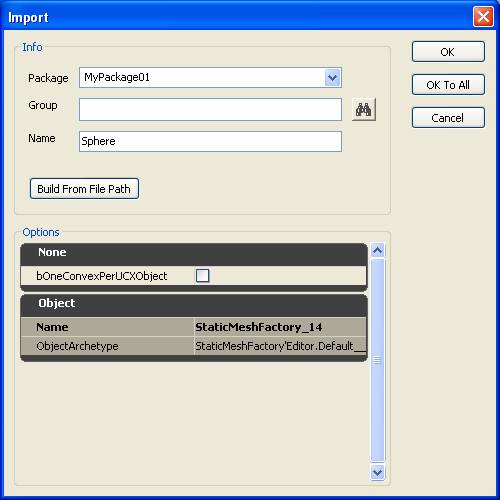
YouÆll see the Import dialog.Ā The ōNameö should be already filled in (based on the filename.)Ā But youÆll need to choose a package to put the sphere into.Ā Either create a new package, or type the name of an existing one.Ā Hit OK to import your mesh.
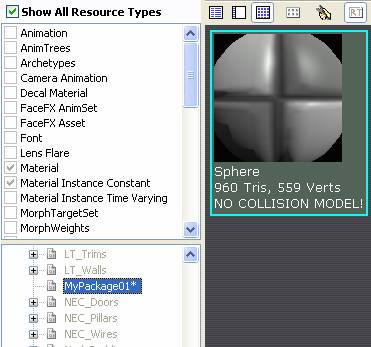
Select your package in the Generic Browser list, and it should have your sphere listed inside of it.Ā Save your package, and the sphere is ready for use!
4) Place your mesh in the level
That might have seemed like a lot of work, but once youÆre all set up, bringing in a new mesh is really easy.Ā For now though, itÆs time for some payoff.Ā LetÆs place the sphere in our level.Ā
Open up the test level youÆve been working on (or create a new level) and save it as a new filename.
As we did in the second tutorial, select the mesh in the generic browser, switch back to your main editor window, hold the ōsö key, and click on the ground.
If youÆre like me, the sphere is pretty small, and itÆs half way sinking through the ground.Ā Still, pretty cool!Ā You can rebuild lighting, run the level, and run around your sphere.
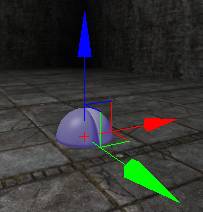
So letÆs fix the sphereÆs scale and its pivot point.Ā Switch back to your 3D program (Max or Maya.)Ā
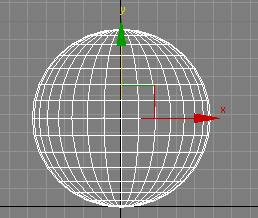
By default, one unit in Max or Maya is 1 unit in Unreal.Ā (And the player is roughly 88 units tall.)Ā So use that as a guide and make the sphere about as big as the player.Ā (Make the radius 44, while will give us a diameter of 88.)Ā
The pivot point of your object, when you export it, is simply the origin of the world.Ā So move the sphere up so that the very bottom is sitting at the origin.Ā It should look something like this.
Re-export over your old ASE file, and re-import into the same package.Ā Move the camera around in the game world and youÆll see the sphere update.Ā It may seem a little on the small side, but if you run your level and run into the sphere, youÆll see that it comes just over the top of your head.
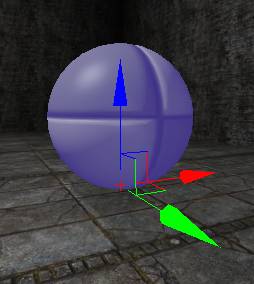
Save your map, and weÆll move on to some even cooler stuff.
One final note about Maya ¢ if youÆre working with larger assets (the size of buildings) you may need to open up the Camera Attribute Editor and modify you clip planes.Ā Make the far clip plane something large (100,000), but also increase the near clip plane (to 0.5 or 1) or youÆll encounter artifacts.
5) Add a material to your mesh
LetÆs replace the checkerboard texture with a real material.Ā WeÆre going to be hopping back and forth between packages in the Generic Browser, so you may lose track of your sphere mesh, but remember you can always find the package alphabetically, or right-click on the sphere in the scene and select ōSync Generic Browserö.
Double-click on the sphere object in the Generic Browser.Ā This opens up the Static Mesh Editor, where you can set all kinds of properties, including what material is assigned to the object.Ā Try zooming and rotating around the sphere using the left and right mouse buttons.
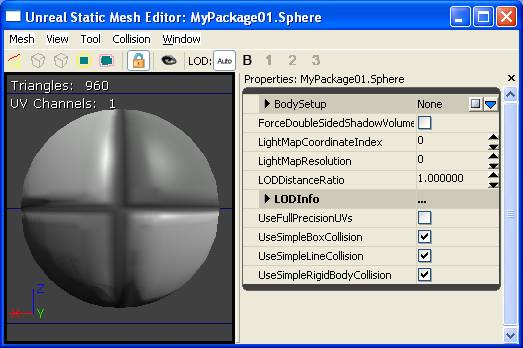
The material is kind of buried.Ā ItÆs under LODInfo->0->Elements->0.Ā Open that up now.
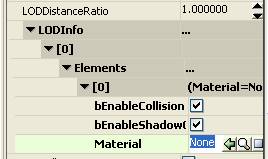
To plug in a material, weÆre going to need to find one in the Generic Browser.Ā So move this window off to the side (DonÆt close it!).Ā Find a package with a good-looking material in it, and select the material.Ā (Try HU_Floor2.)Ā
Now switch back to your Static Mesh Editor window.Ā Click on the little green arrow to the right of the Material field.Ā The material you selected will be applied to the object.Ā If it doesnÆt work, you may have accidentally unselected the material, or selected something different (like a texture, or like your sphere mesh!)Ā
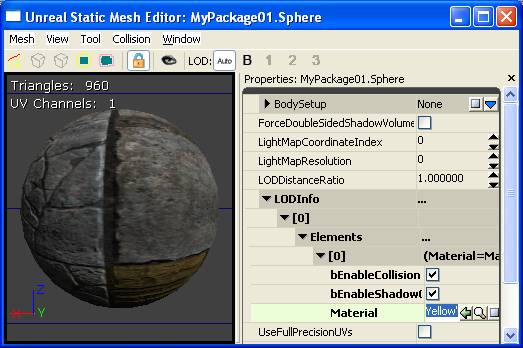
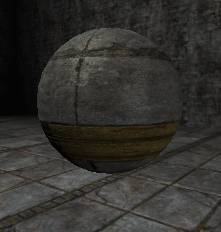
Your sphere should now show up textured in the level.Ā Save your package and test it out!
One other useful thing ¢ if you press the eyeball icon at the top of the Static Mesh Editor window, that will set the thumbnail angle in the generic browser to match the current view of the object in the Static Mesh Editor.Ā ItÆs not that big of a deal with a sphere, but for other object types this can be very important.

6) Generate collision geo for your mesh
If youÆve been testing like I told you, youÆve probably noticed that you can run right through your mesh.Ā ThatÆs no good!Ā We want it to block our progress ¢ in other words, we want to collide with it.
Unreal treats rendering and collision completely separately ¢ and with good reason!Ā We want the player experience to be smooth, with no snags on small extruding bits of polygons.Ā Not to mention itÆs better for performance.Ā When you shoot at an object it uses the visible mesh to detect if you hit it, but for the player, we need simple collision geo.Ā Right now thereÆs no collision geometry for our sphere, which is why we can walk through it.Ā LetÆs fix that.
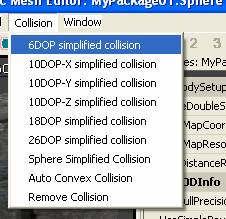
We can create custom collision geo in Max/Maya (and weÆll do that in a minute), but for something simple like a sphere we can let Unreal generate collision geo for us.Ā Make sure your Static Mesh Editor is open, then click on Collision->6DOP simplified collision.Ā
Now click on the ōShow Collisionö button, and zoom out from your sphere a little.Ā YouÆll see a green box around it ¢ thatÆs your collision geo!Ā
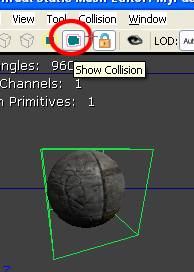
Save your package and run the level.Ā You canÆt pass through the sphere anymore.Ā And if you try, you can probably tell that youÆre colliding with a box, though during normal gameplay youÆd probably never notice.
Try some of the other options for generating collision geometry.Ā Sphere collision seems like an obvious choice, but I just tried it and it doesnÆt seem to work.Ā Bummer.Ā You can get a much closer fit with 26DOP Simplified Collision or Auto Convex Collision, but 10DOP-Z is probably the best balance of detail and performance ¢ it creates a rough cylinder shape around your sphere.Ā Try it out, and youÆll see that you really donÆt need more detail than that.
7) Add custom collision geo to your mesh
You can build your own collision geo (in Max or Maya) from any type of polygon object that you want.Ā Starting as a box is most common, but you could do a cylinder or sphere if you need to.Ā You can also piece together a couple objects to form your collision geo ¢ if itÆs a big irregular shape like an archway, you might have 3 boxes that roughly cover the shape of the geo.Ā
The main thing to understand about authoring your own collision geo is that it needs to be made from convex meshes.Ā ItÆs simple to understand in 2D ¢ just avoid indentations!
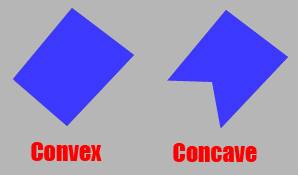
ItÆs a little harder to visualize in 3D, since the triangulation of your mesh starts to matter.Ā But donÆt sweat it too much ¢ just make sure you always view your collision in Unreal after you import your mesh.Ā If it looks like it got split up, then it wasnÆt all convex, and you may need to fix it.
So here are my five rules for building collision geo.
1) No concave surfaces!
2) Keep it simple!Ā Every polygon and every additional primitive hurts performance.Ā (And as we saw with the sphere, it doesnÆt need to be an exact match.)
3) Try for a snug fit.Ā The collision can poke out a little, and it can fit inside the mesh in others, it just needs to ōfeelö good when you run around it.
4) Only build what the player will notice.Ā If itÆs a teapot, a simple box will do.Ā If itÆs a statue, maybe a lopsided cylinder.Ā
So letÆs build a collision box around our sphere.Ā Go back to your 3D program andģ well, make a box around your sphere.
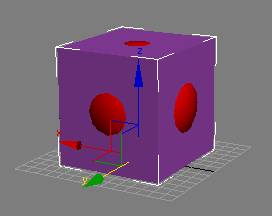
So how does Unreal know the difference between collision geo and renderable geo?Ā ItÆs all in the naming conventions.Ā Edit the name of your collision box so that it has ō_MCDCXö at the end.Ā (Yes, it needs to be all capital letters.)

Select both the box and sphere, export, and re-import into Unreal.Ā On import youÆll notice a new dialog asking if you want to overwrite the existing collision geo.Ā You do!Ā (If this message doesnÆt pop up, you may have done something wrong, like misnaming the collision or not selecting it for export.)

Open up the static mesh editor, turn on collision, and you should see your box.Ā Save your package and test it out.Ā All set!
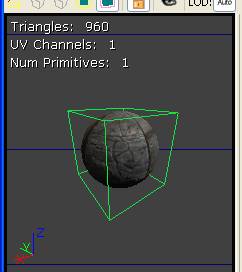
Oh, and for demonstration purposes, hereÆs what happens if you have concave geo.Ā I grabbed one of the verts and pulled it up.Ā You can see that it has an indentation now, and that it sliced the extruding part into a separate collision mesh.Ā (And it says ōNum Primitives: 2ö ¢ another good tip!)
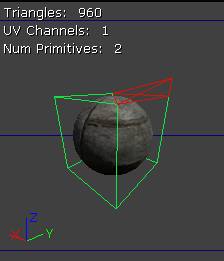
One last thing ¢ if you need to use multiple collision primitives to cover your mesh, just name them all with ō_MCDCXö at the end and make sure theyÆre selected when you export.Ā They should come into Unreal properly.
8) Other pitfalls to watch out for, and useful tips, when creating your own static meshes
Polygon Count ¢ As with any game engine, weÆre concerned with the number of triangles a mesh has, not polygons.Ā Take a look at an Unreal scene to get a sense for the triangle counts they used.Ā Lots of meshes are in the range of 400-1000, though special case stuff (like statues) can be upwards of 6000.Ā Small stuff that repeats a lot tends to be more like 100-400.Ā Remember that polygons slow down performance AND eat up memory, which makes your map slower to load, and may actually prevent it from loading on PS3.Ā The maximum triangle limit is around 30,000 triangles.Ā
Multiple Materials ¢ You can apply multiple materials to your mesh, but try to keep the number as low as possible.Ā From a performance standpoint, every new material you add effectively counts as an extra mesh. For a one-off special object, itÆs not a big deal, but be careful with meshes that will be repeated many times around the scene.Ā (In Maya, just apply materials to the meshÆs faces as you would normally. In Max, create a multi-sub material, and set the number of sub-materials as low as possible.)
Surface Normals ¢ You need to pay careful attention to the direction your surface normals are facing.Ā Be sure to look at your mesh with backface culling on (or some other similar trick) to make sure polygon normals are facing the proper direction.
2-Sided Faces ¢ This is closely related to the previous point.Ā Most Unreal materials support only one-sided faces.Ā (In other words, backfaces are transparent.)Ā You CAN make a material two-sided, but the backfaces generally wonÆt accept lighting properly.Ā In most cases, youÆre better off duplicating your geometry and flipping the normals.
Hard/Soft Edges or Smoothing Groups ¢ (Max vs Maya terminology) ¢ Unreal will use the smoothing groups or hard/soft edges you set.Ā So set it!Ā It makes a big difference in the look.
UVs ¢Unreal supports UVs just like youÆd expect.Ā You can also create a second UV set and use it to generate lightmaps (but weÆll discuss that more in a later tutorial.)
Vertex Colors ¢ Unreal supports vertex coloration, but you need to author a special material to use it.Ā By default, most materials ignore it.
Setting the Grid ¢ ItÆs useful to set your grid and camera properly inside Maya or Max.Ā Set the grid spacing to a power of two (like 32 or 64), and the subdivisions also to a power of two (like 4.)Ā This way, you can make sure all of your objects will line up properly when you get them into Unreal.
Setting the Camera ¢ Particularly in Maya, you may need to set the Far Clip Plane to a larger number than default.Ā (say, 100,000 units.)Ā But if you do that youÆll lose precision, and youÆll notice flickering.Ā To fix it, also increase your Near Clip Plane (say, to 0.1 or 0.5.)Ā
Creating a Reference Mesh ¢ Sometimes itÆs hard to judge scale of environment props just by measuring them.Ā In lots of cases, the best way to figure out scale is to create a box mesh that roughly fits the shape and size of the character ¢ this makes it a lot easier to eyeball the size.Ā A typical UT3 character is 88 units tall, so make a box with that height, and proportions that look good.Ā (88x20x35 looks pretty good, for instance.)Ā You can then move the box around your Maya or Max scene to help judge height.
